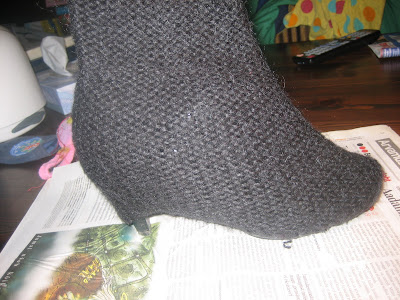
But that's not what I wanted to talk about, I wanted to talk about my new high-heeled shoes. Which I love. But not loved very much before, they had too much details. You can make the same trick with all the shoes you can wear in the autumn and spring and ofcourse in the winter if it's warm enough.
The perfect not-enough-warm-day's boots
Sweater boots here they come. You'll need:
- shoes, which you'd like to change completely
- sweater's sleeves(I used quite big ones)
- super glue
- scissors
- Thread, needle, pins
- A sewing machine
- (optional) buttons or ribbon
_______
Sviiter-saabaste jaoks on sul vaja:
Sviiter-saabaste jaoks on sul vaja:
- kingi või saapaid, mida muuta
- kampsuni varrukaid (piisavalt laiu, millesse jalg sisse mahuks, neid saab alati väiksemaks õmmelda, kui vajadus)
- superliim
- käärid
- niiti, nõela nööpnõelu
- Õmblusmasin
- (valikuline) nööpe või paela
1. Otsi endale kingad, mida muuta. Lõika kampsunil varrukad ära, kui sa seda juba teinud ei ole. Mida suuremad varrukad, seda parem ja kergem. Pane varrukas kingale ümber ja tee kindlaks, et varrukas ei ole liiga lai ja istub kinga peale ilusasti (kontsaga kinga peal tuleb eriti hoolikalt kontsa juurest parajamaks tegema).
B)If made sure the sizes and all that fits, take the sleeve off and turn it inside out (!important!) and put it on to a shoe just as shown on the picture
2.Kui kindlaks tehtud, et suurus ja asetus õige, siis võta varrukas ära, keera pahupidi(!tähtis!) ja pane tagurpidi kinga kylge, nii nagu pildil näidatud
2.Kui kindlaks tehtud, et suurus ja asetus õige, siis võta varrukas ära, keera pahupidi(!tähtis!) ja pane tagurpidi kinga kylge, nii nagu pildil näidatud
C)Glue the edges with a superglue
3. Liimi ääred superliimiga kinni.
D)Turn the sleeve right side out again, now these soes should look like cool shoes already. If the glue doesen't hold some places apply more glue
4. Keera varrukas yle kinga jälle õiget pidi, nyyd peaksid kingad kinga moodi juba välja nägema. Kui kuskilt liim lahti tuleb, siis paranda.
G) Take some thread and go through all the little loops at the end of the sleeve. Sew the edge with a sewing machine and then turn the edge outwards so it won't strech. Secure it with pins and then sew again
5. Aja varruka silmadest niit või lõng läbi, igaks juhuks, et silmused hargnema ei hakkaks. Õmble äär õmblusmasinaga kinni. Keera äär väljapoole yhe keeru võrra ja õmble kinni, nii ei hakka ots venima.
E)There is a million possibilities how to end these shoes I turne the side down and sewed some buttons on and attached a ribbon. Possibilities are endless
6.On mitu võimalust, kuidas selliseid saapaid viimistleda, mina valisin sellise, kus keerasin ääre alla välja tagurpidi ja õmblesin paar nööpi ka kylge. Kuid kujutlusvõime annab vabad käed ja igayks võib viimistleda nii, nagu meeldib
F)Wear your shoes with pride!
7. Kanna oma kingi/saapaid uhkusega ! :)


