Mad Lemon Jewelry

Jewelry blog, where you can see MLJewelry, beading and hammering; DIY projects, useful tips about everything about jewelry and making it.

Seed bead balls, turtles

Hey!
I was with my cousin for two weeks and I couldn't post. But all good things have to end so she went back home today. As she says she is from the country side. She usually said : "Maalt ja hobusega". But I'm not able to translate that so it would sound as good.
We managed to go to listen to a concert in a valley in Tartu. Some estonian groups which (thinking of now)consisted only of men. Strange. Oh sorry 1 woman for 20 men too..
This jewelry I made before.

Seed bead turtles (jewelry)
"Pink world's turtles"
I never planned to do turtles. They just happened when I was unsuccsessfully trying to do seed bead balls similar to the ones below. They looked really like turtles to me so I made legs and heads for them.


They are a pair in love :), How cute!


"Opposites of colours"
They are actually opposites of each other.


Bracelet from seed bead beads. Nice clasp although

Bye!

Golden angels, icey flowers and Football cup almost over

Football World Cup in South Africa is almost over. There's just one game left, the final.
Yesterday was the game for the 3rd place and Germany won Uruguay. It happened that I was on Uruguay's side. But it happened to be so that Germany won.
Today the Netherlands and Spain play. Hope the best team wins.
*Congrats spain*


Some more jewelry:
Swarovski flowers, blue
"Icey flowers"
Crystal flowers that look like frozen water, ice. Three crystal petals connected with silver wire

"Red bundle"
While doing the icey flower above there was a stage when I had to but them together so they looked the same as the "red bundle". That's where the idea came from. Used silver wire, thin one.


"Deep in the ocean"
0.8mm wide silver wire and a lot of seed beads


"fragile gold angels"
0.8 gold wire.. They kinda look like angels I discovered 2 sec ago.


sry for the dusty bottle
united!

Bye!

DIY: T-shirt: shred and weave

Shredded and weaved T-shirt
This DIY project will be about shredding and weaving your t-shirt to make it more intresting.
I went to a birthday, my aunt's one and it was a theme party so my mum ordered t-shirts and I was sure they were going to be boring so my plan was to shred and weave. I like the T-shirt.

Try this at home ;)
I'll add  a bunch of pictures too, so it will be easier for you to do. But there will be estonian and english mixed
You'll need:

  • scissors
  • a boring T-shirt
  • A ruler
____________________
Vaja on:
  • kääre
  • igavat T-särki
  • joonlauda
Put your T-shirt onto the table and cut off the neck area. You can choose yourself how big u want neck to be 2cm from the original neckline for normal sized hole for your neck. More than 2 cm away if u want a bigger neck hole.
______________
Pane oma T-särk lauale ja lõika ära kaela osa. Nüüd saad valida, kui suurt kaelaauku soovid, 2cm algsest kaelaaugust suurem normaalse suurusega kaelaaugu jaoks, rohkem kui 2cm suure kaelaaugu jaoks.


Fold the back of the shirt to half so u could cut it freely without damaging the front. Fold it so that the sides match
______________
Voldi särk kokku niiet tagaosa oleks pooleks ja küljed läheksid kokku.


Put the ruler onto the shirt's back area. Decide how big V-hole u need and want.
______________
Paiguta särgi tagaosa peale joonlaud, otsusta, kui suurt V-auku sa selja peale soovid.


Start cutting the strips. They should be about a pinky finger wide. Put don't do too thin or they will break.
______________
Hakka seljaosast ribasid lõikama. Need peaksid olema umbes väikese sõrme laiused.

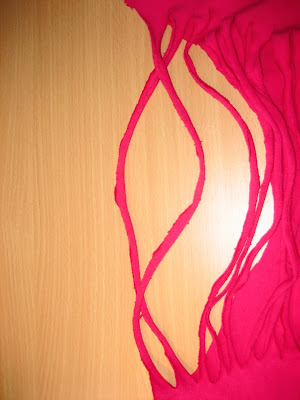
Strech the strips through your finger so they would become more rope-like.
______________
Venita ribad sõrmede vahel, lase sõrmede vahelt läbi nii, et ääred rulluksid ja ribad oleksid nöörisarnased.


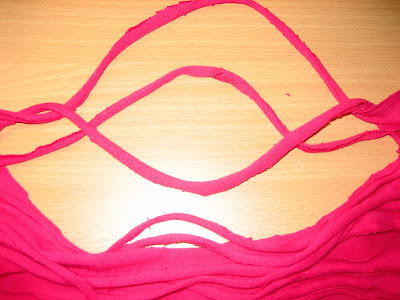
Now start weaving: take the first two strips and take the second one and put it under and then over the first string. Now move down a string and do the same thing with 2nd and 3rd.string. Under over. All the way down. Don't miss a string and leave the last string unweaved.
______________
Hakkame punuma: võta kaks esimest riba sõrmede vahele ja pane teine riba alumise alt ja seejärel ülevalt läbi,  tekib aasa moodi moodustis, liigu yks riba allapoole ja tee seda sama 2. ja 3. ribaga. Alt läbi ja tagasi üle. Punu kõik ribad niiviisi läbi, ära jäta yhtegi vahele, kuid ära punu viimast riba.


Cut the last string in half and tie it around the last loop u have.
______________
Lõika viimane riba pooleks ja seo viimase aasa kylge, mis sul on.


It's super easy and fast. Your elegant and fierce T-shirt is ready.
______________
See on väga lihtne ja kiire. Sinu uus ja huvitav T-särk on nyyd valmis


Reform the jewelry. (Stone rings)


Again old earrings which I wasn't completely satisfied so I had to make them better and more beautiful.
I often do my jewelry over to make it better. Cause I want my things to be so I could be satisfied with them. I'm also showing you some rings with stones which names I don't remember.


At first they looked like this, nothing special.
Swarovski bundle bicone 4mm
And after the makeover they look like this. "Chocolate's crystal bunch"
I like them more now, than before.

And some rings.
Semi-precious stone wire wrapped rings
Now I can tell what are the names of these stones, thanks to some wonderful people on the best jewelry forum ever ;) JewelryMaking Forum

This goldish one is citrine
And this is smokey quartz, I just love those little names
They are my favourite because they are just the right size and they look elegant. I even did a tutorial on how to do them . It's here. They are semi'precious stones. What a weird name!

Bye!